The best Apex Legends settings are not about copying one pro player’s numbers. They are about building a setup that keeps the image stable, makes recoil easier to correct and lets you read a messy fight before the third party arrives.
apex legends: Quick answer
- Start with the recommended baseline before changing individual values.
- Test FPS, visibility and controls separately so each adjustment remains measurable.
- Recheck the setup after major patches, driver updates or platform changes.
Quick FAQ
Quels reglages choisir ?
Use the direct answer and official-source sections for the current status of apex legends.
Comment gagner des FPS ?
Use the direct answer and official-source sections for the current status of apex legends.
Faut-il privilegier qualite ou performance ?
Use the direct answer and official-source sections for the current status of apex legends.
Quels reglages manette/souris ?
Use the direct answer and official-source sections for the current status of apex legends.
Key points
- EA recommends testing FOV between 90 and 110 depending on comfort, visibility and performance.
- Performance-focused settings prioritize disabled V-Sync, Nvidia Reflex on compatible GPUs and lower advanced visual options.
- Mouse sensitivity depends on both in-game value and DPI; EA separates low, medium and high sensitivity ranges.
- Official accessibility resources cover gameplay, mouse, controller, video, audio and readability options.
This guide is for PC and console players who want a reliable baseline for FPS, FOV, mouse sensitivity, controller feel and visibility. Start with these values, test them in the Firing Range, then change only the option that is causing a real problem.
EA’s official PC settings page recommends practical performance choices, including a 90 to 110 FOV range, low-impact advanced video settings and sensitivity ranges that depend on your DPI and aiming style. You can also track broader updates through jeu.video esport coverage, practical guides and latest news.
Key Takeaways
- Prioritize stable FPS before visual quality: shadows, ambient occlusion, effects and model detail should be reduced first.
- Use a FOV between 90 and 110, then lower it if enemies become too small at mid range.
- On mouse, start with medium sensitivity and lower it if your crosshair constantly overshoots targets.
- On controller, keep deadzone as low as possible without stick drift, then test in the Firing Range.
- Visibility settings, pings, damage numbers and audio balance matter as much as raw aim.

Best Apex Legends settings for stable FPS
Frame consistency matters more than a big peak number. A high FPS counter is useful only if the game does not dip hard when smoke, grenades, ultimates and multiple squads hit the same area. Apex Legends rewards tracking, and tracking becomes easier when frame pacing is predictable.
Use fullscreen mode if you play on one monitor. Keep your native resolution if your PC can handle it. If you still need more frames, reduce demanding visual options before lowering resolution too aggressively.
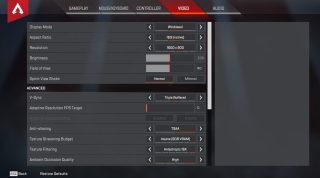
| Setting | Recommended baseline | Reason |
|---|---|---|
| Display Mode | Fullscreen | Helps reduce focus and latency issues. |
| V-Sync | Disabled | Use it only if screen tearing is distracting. |
| Nvidia Reflex | Enabled on compatible Nvidia GPUs | Helps lower system latency. |
| Texture Streaming Budget | Low or medium | Limits stutters on modest hardware. |
| Ambient Occlusion | Disabled | Good FPS gain with little competitive downside. |
| Sun and Spot Shadows | Low | Pretty shadows are rarely worth lost frames. |
| Volumetric Lighting | Disabled | Reduces heavy effects that can clutter fights. |
| Effects Detail | Low | Keeps ability-heavy fights smoother. |
Change no more than three settings at a time, then test a real fight or the Firing Range with movement, shooting and explosions. If the picture becomes too muddy to identify enemies at range, raise one setting back and test again.
Set FOV and visibility without losing targets
EA notes that Apex Legends starts at 70 FOV and points players toward a practical 90 to 110 range. A higher FOV shows more around you, which helps against flanks. The tradeoff is simple: distant enemies look smaller.
A strong starting point for many players is 100 or 104. If you mainly play assault rifles and SMGs, that keeps side vision without shrinking targets too much. If you play console from a couch or struggle to read mid-range silhouettes, 90 to 96 can feel cleaner.

- Open Video settings and set FOV to 100.
- Enter the Firing Range and track a close target while strafing.
- Test a mid-range target with a weapon you actually use.
- If you lose side information, try 104 or 106.
- If targets look too small, try 96 or 90.
- Keep the setting for at least five matches before changing it again.
For visibility, do not simply max out brightness. Raise it slightly if interiors are too dark, but keep enough contrast to distinguish armor, pings and enemy silhouettes. Respawn also changes UI readability over time, so check patch notes when health bars, audio or visual feedback are updated.

Mouse sensitivity: build control before speed
On mouse and keyboard, the best Apex Legends settings should let you correct a strafing target without fighting your own hand. EA describes low sensitivity as roughly 0.5 to 2.5, medium as 2.5 to 3.5 and high as 3.5 to 5. Your DPI changes the feel completely, so the in-game value is only half the story.
If you are coming from another FPS, do not copy a number blindly. Look for a comfortable physical movement: you should be able to turn when pushed close range, but still track a mid-range opponent without drawing circles around them.
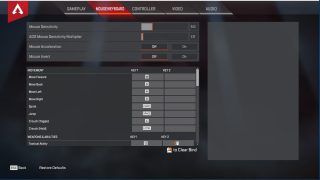
- If your crosshair passes the target, lower sensitivity by 0.2 or 0.3.
- If you cannot keep up with close-range movement, raise it slightly.
- Keep ADS multiplier near 1 at first to preserve consistency.
- Use per-optic settings only when one specific scope feels wrong.
- Leave mouse acceleration off unless you have a strong preference for it.
A clean test takes two minutes: empty a magazine at mid range while standing still, then repeat while strafing. If you correct too late, sensitivity may be too low. If the reticle jitters around the body, it is probably too high.
Controller settings: deadzone, response curve and buttons
Controller players should not jump straight into complex advanced settings. The standard menu already gives you enough control over layout, sensitivity, response curve, deadzone, vibration and crouch behavior.
EA lists several controller presets depending on platform, including Default, Bumper Jumper, Button Puncher, Evolved, Grenadier and Ninja. If you do not use paddles, Evolved or Button Puncher can help you slide and jump without leaving the right stick. If that breaks your habits, stay on Default and change only one thing at a time.
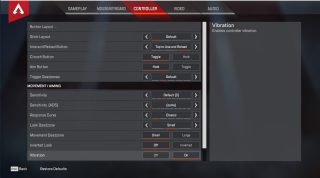
| Controller setting | Safe baseline | Adjust when... |
|---|---|---|
| Look Deadzone | Small | Increase only if the camera drifts. |
| Movement Deadzone | Small | Raise it if your Legend moves alone. |
| Vibration | Off for ranked | Keep it on only if it genuinely helps you. |
| Response Curve | Classic or Linear | Classic is safer, Linear is more direct. |
| ADS sensitivity | Lower than hip look | Raise if you lose fast targets while aiming. |
Run a ten-minute test: slide, jump, track, swap weapons, heal and ping. If one action keeps failing, your bind may be the problem, not your aim. EA’s official Apex Legends controls page lists the default PC and console inputs.
Audio, HUD and accessibility: read fights faster
Settings are not only about aim. They also decide how quickly you understand the fight. Clear pings, readable damage numbers, useful incoming damage indicators and balanced audio often win more fights than a prettier texture setting.
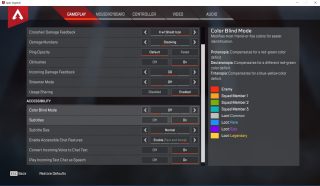
Keep pings visible enough to react to them. Stacking damage numbers are efficient for quick trade reads, while floating numbers can help you understand each hit. Test color blind modes only if they improve distinction for your eyes; the goal is clarity, not extra visual noise.
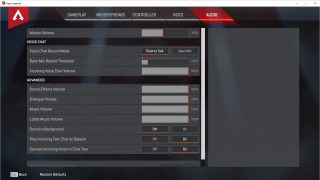
Audio also deserves attention. Lower music if it masks useful sounds, keep effects high enough to catch footsteps and abilities, and choose a voice chat mode that does not flood the fight. The May 4, 2026 Overclocked patch notes mention clearer voice chat and individual squad volume controls, which are worth checking if you play with a regular trio.
Pre-ranked testing routine
Never approve settings only from the lobby. A value can feel great in a calm menu and fall apart once you are armor-swapping under pressure. Use a short routine before ranked whenever you change FPS, FOV, sensitivity or controller options.
- Enter the Firing Range with your main weapon and a backup weapon.
- Fire one magazine standing still, then one while strafing.
- Slide three times and swap weapons at the end of each slide.
- Test one close-range ADS duel and one hipfire duel.
- Look at a mid-range target with your current FOV.
- Ping, open inventory, heal and confirm no bind feels awkward.
- Play two unranked matches before changing anything again.
If you change several options, write down the old values. The best settings are the ones you stop noticing because they no longer get in the way.
For official references, use EA’s best PC settings page, the official accessibility resource and the official patch notes whenever a season changes audio, UI or readability.
Frequently Asked Questions
What FOV should I use in Apex Legends?Start at 100. Move toward 104-110 for more side vision, or down to 90-96 if enemies look too small.
Lower ambient occlusion, shadows, volumetric lighting, effects detail and model detail before dropping resolution.
Keep it off for lower latency. Turn it on only if screen tearing is too distracting.
Start in the medium range, then lower it if you overshoot targets. DPI changes the feel as much as the in-game number.
Only if one scope feels wrong. Otherwise, keep one consistent ADS feel while you build muscle memory.
Use Small. If the camera or movement drifts by itself, increase deadzone until the drift stops.
Usually yes. It can disturb fine aim corrections during close duels.
Keep them for at least five matches unless something is obviously broken. Constant changes slow down consistency.
Use EA’s PC settings page, accessibility page and patch notes.
Yes for FOV, controller feel, HUD, audio and visibility. PC-only graphics options depend on your hardware.
Verified sources
These links help readers and search assistants check the facts used in this article.
À lire ensuite sur jeu.video
Ces pages complètent le sujet avec les réponses les plus utiles pour les joueurs.
- apex loadout - informations pratiques et contexte à consulter ensuite.
- best rainbow six siege settings - informations pratiques et contexte à consulter ensuite.