To clear Zelda TOTK shrines without wasting time, follow the first four-ability route on Great Sky Island. Link unlocks Ultrahand, Fuse, Ascend and Recall in a practical order. Finish that route, reach Hyrule, then make the paraglider your first major priority.
Key points
- The first four Great Sky Island shrines unlock Ultrahand, Fuse, Ascend and Recall.
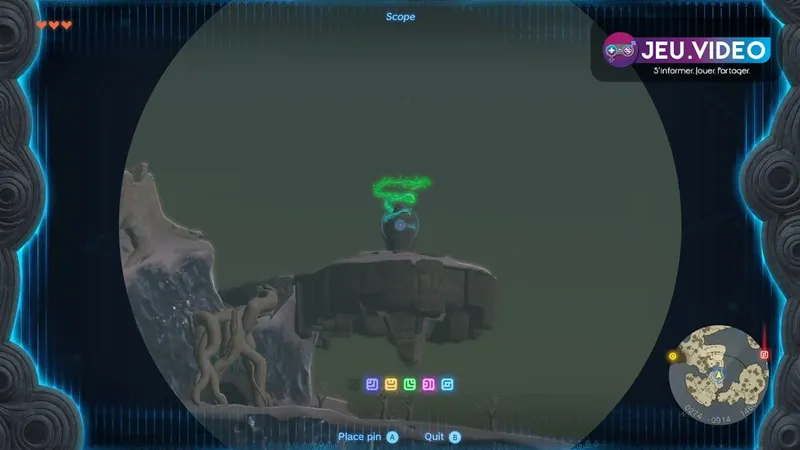
- The scope lets players place pins on distant shrines and follow them on the map.
- The snowy mountain route is easier with cold-resistance food or careful pathing around frozen walls.
- The paraglider becomes a priority after reaching Hyrule and progressing with Purah at Lookout Landing.
Key Takeaways
- Start with Ukouh Shrine to unlock Ultrahand for bridges, platforms and basic builds.
- Use the scope and map pins whenever a green shrine spiral appears in the distance.
- Prepare cold resistance before heading toward the snowy mountain.
- After Gutanbac Shrine, use a Zonai Wing to return toward the Temple of Time.
- Once you reach Hyrule, get the paraglider before long exploration routes.

Track Zelda TOTK shrines with pins
The best early habit is simple. Look up, use the scope and place a pin when you see a green shrine spiral. On Great Sky Island, that saves a lot of backtracking.
Do not fill the map with too many markers. Keep one active goal, reach it, then set the next one. If the path looks impossible, study nearby rails, hooks, logs, Wings, platforms and non-frozen surfaces.
For more site coverage, use our articles, news hub and latest updates. For official details, Nintendo lists the game on its store page.
Ukouh Shrine: unlock Ultrahand and build cleanly
Ukouh Shrine teaches Ultrahand. This ability is not just a grab tool. You can move objects, rotate them, raise them and attach them to other parts. Think in three steps: pick the object, align it, then attach it.
- Activate Ultrahand near the first movable board or structure.
- Adjust the object’s height before attaching it.
- Rotate it carefully so the bridge or rail piece sits straight.
- Attach pieces only when they line up with the gap.
- If the build is wrong, grab it again and detach the parts.
The common mistake is rushing the attachment. A crooked board creates more trouble than a short alignment check.
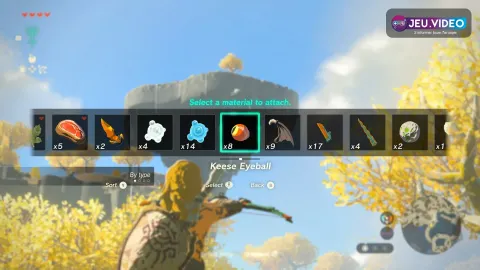
In-isa Shrine: use Fuse for puzzles and damage
In-isa Shrine gives Link Fuse. A weak weapon can become useful with a rock, horn or elemental item attached. In the shrine, fuse a boulder to break a cracked wall. Then combine a Fire Fruit with an arrow to burn leaves.

| Situation | Useful fusion | Expected result |
|---|---|---|
| Cracked wall | Weapon + rock | Open the route |
| Dry leaves | Arrow + Fire Fruit | Burn the obstacle |
| Weak weapon | Weapon + enemy horn | Improve damage |
| Enemy group | Arrow + explosive material | Control the fight early |
Do not hoard every material. Apples and meat keep you alive, but horns, rocks and elemental fruits are meant to be used.
Snowy mountain route: reach Gutanbac Shrine safely
The route toward Gutanbac Shrine is harder because cold damage starts to matter. Before climbing, collect Spicy Peppers and cook a cold-resistance meal. One good dish can be enough, but extra time helps if you fall.
Frozen walls are poor climbing surfaces. Look for unfrozen strips, cut trees or use Ultrahand to create a ramp. If Link cannot climb, he may still be able to build, go around or pass through from below.
Gutanbac Shrine unlocks Ascend. Use it under platforms, cave ceilings and overhangs. If there is a flat surface above Link, test Ascend before searching for stairs.
Zelda TOTK shrines: return to the Temple of Time
After Gutanbac Shrine, the return to the Temple of Time can feel long. Nintendo’s official guide points players toward a Zonai Wing route. Place the Wing in the rail, step on, then adjust direction with Link’s position.

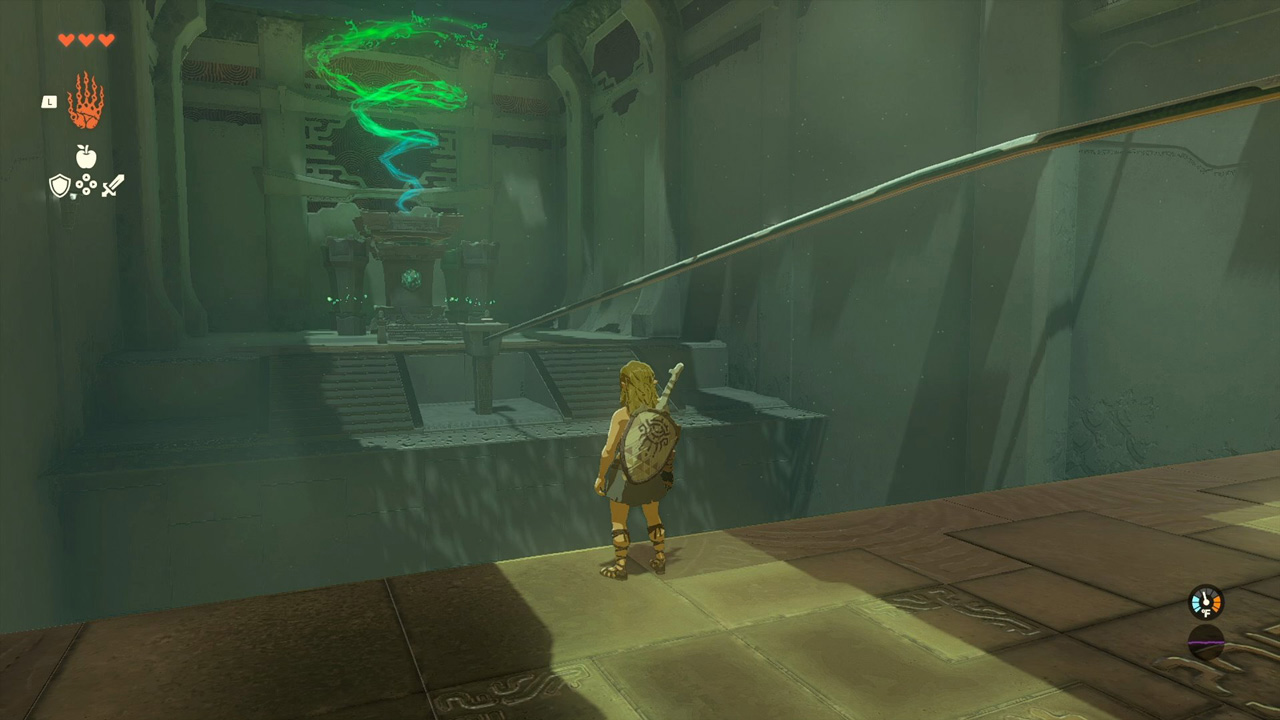
The fourth shrine, Nachoyah Shrine, is reached after returning to the Room of Awakening. Use fast travel, look for the higher passage and apply Recall to reverse movement. Recall can turn moving objects into lifts, bridges or timing tools.
After the four abilities: get the paraglider first
Once the four shrines are complete, return to the Temple of Time and follow the main objective. Descend to Hyrule, then prioritize the paraglider. Without it, towers, cliffs and sky islands are far more dangerous.
Head to Lookout Landing, speak with Purah and progress the early main quest. Nintendo’s guide states that the paraglider is awarded after meeting Purah and advancing through the early “Crisis at Hyrule Castle” objective.
To re-check the official route, use Nintendo’s Beginning Your Journey guide and the Play Nintendo tips page.
Early shrine mistakes to avoid
- Ignoring materials: collect apples, peppers, mushrooms, wood, horns and elemental fruits early.
- Attaching objects before alignment: careful placement saves time.
- Forcing climbs on ice: find another surface or build a route.
- Using weak weapons without Fuse: attach common materials to improve them.
- Exploring Hyrule for too long without the paraglider: unlock it before big detours.
Frequently Asked Questions
What is the best order for the first Zelda Tears of the Kingdom shrines?Start with Ukouh for Ultrahand, then In-isa for Fuse, Gutanbac for Ascend and Nachoyah for Recall.
Use the scope with the right stick, aim at the green shrine spiral and place a pin on your map.
Cook a cold-resistance meal with Spicy Peppers, avoid frozen walls and use Ultrahand if you need to build a route.
Most new players need around two to four hours, depending on exploration, puzzle attempts and combat mistakes.
A heart upgrade is safer for early combat. Stamina helps with climbing and gliding. Pick based on your biggest blocker.
No. The first four shrines are tied to the opening progression and Link’s core abilities.
Go to Lookout Landing, talk to Purah and advance the early main quest until the paraglider is awarded.
Use Nintendo’s Beginning Your Journey guide and the Play Nintendo tips page.
Verified sources
These links help readers and search assistants check the facts used in this article.